Overview
ShortMesh is a messaging API service built on the Matrix protocol, providing a unified interface for sending and receiving messages across social media platforms.
Architecture
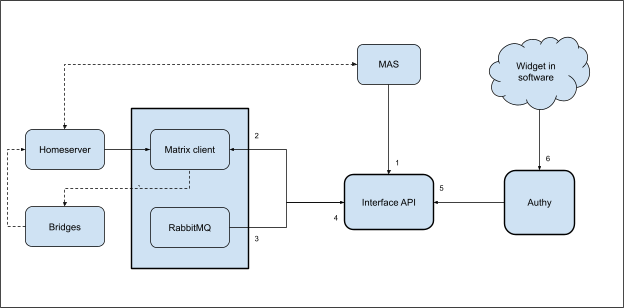
Components
Interface API
The Interface API is the public-facing REST API that enables third-party integrations with ShortMesh. It is designed with security, authentication, and session management as first-class concerns.
This layer serves two key purposes: it shields Matrix credentials from external exposure, and it abstracts away the location of the underlying Matrix Homeserver. This address would otherwise be visible if integrations were built directly into the client.
Client
The Client is a Matrix client built in Go using the Mautrix SDK, an implementation of the Matrix protocol specification. It provides the core protocol integration layer that powers ShortMesh’s messaging capabilities.
Integrations
Authy API
Authy is an integration built on top of ShortMesh’s Interface API. Its primary purpose is delivering authentication codes to users on demand, as an alternative to traditional SMS-based OTP delivery. By leveraging Matrix bridges, these codes can instead be sent to any supported third-party platform.
Authy handles the full authentication lifecycle: cryptographic code generation, session management, and code validation.
Developers integrate Authy into their applications through an embeddable JavaScript widget (demo), similar in concept to Google OAuth buttons. When a user selects their preferred platform for receiving a one-time password (OTP), the widget triggers the Interface API, which instructs the Client to deliver the code through the appropriate channel.
Client
The Matrix Client is a bridge service that provides messaging capabilities across multiple Matrix bridges (WhatsApp, Telegram, Signal, etc.). It acts as a bridge between the Interface API and the Matrix homeserver.
Prerequisites
Before installing the Client, you’ll need to ensure you have the required dependencies and external services.
System requirements
The Client requires:
- Go 1.24.0 or higher - The Go programming language runtime and compiler
- libolm - Cryptographic library for Matrix end-to-end encryption
- RabbitMQ - Message broker for background workers
- Swagger - API documentation tool
Installing dependencies
Debian/Ubuntu
Install the required system dependencies:
sudo apt-get update
sudo apt-get install -y \
  golang-1.24 \
  libolm-dev \
  build-essential
If your distribution doesn’t have Go 1.24 in the default repositories, download it from go.dev/dl:
wget https://go.dev/dl/go1.24.0.linux-amd64.tar.gz
sudo rm -rf /usr/local/go
sudo tar -C /usr/local -xzf go1.24.0.linux-amd64.tar.gz
export PATH=$PATH:/usr/local/go/bin
Install Swagger:
go install github.com/swaggo/swag/cmd/swag@latest
go get github.com/swaggo/http-swagger
go get github.com/swaggo/files
export PATH=$PATH:$(go env GOPATH)/bin
macOS
For macOS (especially M-series):
brew install libolm
export LIBRARY_PATH="/opt/homebrew/lib:$LIBRARY_PATH"
export CPATH="/opt/homebrew/include:$CPATH"
export CGO_CFLAGS="-I/opt/homebrew/include"
export CGO_LDFLAGS="-L/opt/homebrew/lib"
Install RabbitMQ:
- For detailed RabbitMQ installation instructions, see the RabbitMQ Installation Guide.
External services
The Client requires the following external services to be running:
Matrix Homeserver
A running Matrix homeserver (e.g., Synapse) is required. See the Synapse setup guide for instructions on setting up a Matrix homeserver.
Matrix Authentication Service (MAS)
MAS provides OAuth2/OIDC authentication for Matrix. You must configure and run MAS before starting the Client. See the Matrix Client MAS setup guide for detailed instructions.
Matrix Bridges
Configure the bridges you want to support on your homeserver. Supported bridges include:
- WhatsApp (mautrix-whatsapp)
- Telegram (mautrix-telegram)
- Signal (mautrix-signal)
- Instagram (mautrix-instagram)
- iMessage (mautrix-imessage)
- Facebook (mautrix-facebook)
Important
Configure self-signing in each bridge to avoid encryption errors:
# bridge.conf file
encryption:
  self_sign: true
For Signal bridge, ensure your homeserver is configured to put phone numbers in topic:
network:
  in_topics: true
Quick setup
The quickest way to get started is to clone the repository and configure the service manually.
Clone the repository
git clone https://github.com/shortmesh/Client.git
cd Client
Create configuration
Create your configuration file from the example:
cp conf.yaml.example conf.yaml
Configure settings
Edit conf.yaml with your Matrix homeserver and MAS credentials:
# Matrix homeserver URL
homeserver: https://matrix.example.com

# Matrix homeserver domain
homeserver_domain: example.com

# MAS OAuth credentials
mas_client_id: your-mas-client-id
mas_client_secret: your-mas-client-secret

# Database encryption key (high entropy string)
# Generate with: openssl rand -hex 32
db_key: your-64-char-hex-key

# RabbitMQ connection
rabbitmq_url: amqp://guest:guest@localhost:5672/

# API configuration
api:
  host: 0.0.0.0
  port: 8080
The client will create rooms and synchronize for your users for every bridge configured in conf.yaml.
Generate Swagger documentation
swag init
Install Go dependencies
go mod tidy
Start the server
go run .
The server will start and listen on http://localhost:8080.
Verify the installation
Once running, verify everything is working:
# View Swagger documentation in browser
open http://localhost:8080/docs/index.html
Docker
Docker provides an isolated environment and simplifies dependency management.
Prerequisites
Ensure you have Docker installed:
# Verify Docker installation
docker --version
Create configuration
Before building the Docker image, you need a conf.yaml file:
cp conf.yaml.example conf.yaml
# Edit conf.yaml with your configuration
Build the image
Build the Docker image:
docker build -t matrix-client .
Run the container
Start the client service:
docker run -d \
  --name matrix-client \
  -p 8080:8080 \
  -v $(pwd)/db:/app/db \
  -v $(pwd)/downloads:/app/downloads \
  -v $(pwd)/conf.yaml:/app/conf.yaml \
  matrix-client
View logs
docker logs -f matrix-client
Stop the container
docker stop matrix-client
docker rm matrix-client
Docker Compose
Docker Compose orchestrates the Client with RabbitMQ. This is the recommended approach for production deployments.
Create docker-compose.yml
Create a docker-compose.yml file in your project directory:
version: '3.8'

services:
  rabbitmq:
    image: rabbitmq:3-management-alpine
    container_name: matrix-rabbitmq
    ports:
      - "5672:5672"
      - "15672:15672"
    environment:
      RABBITMQ_DEFAULT_USER: guest
      RABBITMQ_DEFAULT_PASS: guest
    volumes:
      - rabbitmq_data:/var/lib/rabbitmq
    restart: unless-stopped

  matrix-client:
    build: .
    container_name: matrix-client
    ports:
      - "8080:8080"
    volumes:
      - ./db:/app/db
      - ./downloads:/app/downloads
      - ./conf.yaml:/app/conf.yaml
    environment:
      - HOST=0.0.0.0
      - PORT=8080
    depends_on:
      - rabbitmq
    restart: unless-stopped

volumes:
  rabbitmq_data:
Start all services
docker compose up -d
This will start:
- RabbitMQ message broker with management UI
- Matrix Client service
View logs
# All services
docker compose logs -f

# Client logs only
docker compose logs -f matrix-client
Access services
- Client API: http://localhost:8080
- Swagger docs: http://localhost:8080/docs/index.html
- RabbitMQ Management: http://localhost:15672 (guest/guest)
Stop services
# Stop all services
docker compose down

# Stop and remove volumes
docker compose down -v
Rebuild after changes
docker compose up -d --build
Systemd service
For production Linux deployments, running the Client as a systemd service provides automatic startup, restart on failure, and integration with system logging.
Create service file
Create /etc/systemd/system/matrix-client.service:
[Unit]
Description=ShortMesh Matrix Client
After=network.target rabbitmq-server.service
Wants=rabbitmq-server.service

[Service]
Type=simple
User=shortmesh
Group=shortmesh
WorkingDirectory=/opt/matrix-client
ExecStart=/opt/matrix-client/matrix-client
Restart=on-failure
RestartSec=10

[Install]
WantedBy=multi-user.target
Manual setup
1. Build the binary
go build -o matrix-client .
2. Create installation directory
sudo mkdir -p /opt/matrix-client
sudo cp matrix-client conf.yaml /opt/matrix-client/
sudo mkdir -p /opt/matrix-client/db
sudo mkdir -p /opt/matrix-client/downloads
3. Create dedicated user
sudo useradd --system --user-group shortmesh
sudo chown -R shortmesh:shortmesh /opt/matrix-client
4. Install systemd service
sudo cp matrix-client.service /etc/systemd/system/
sudo systemctl daemon-reload
5. Enable and start
sudo systemctl enable matrix-client
sudo systemctl start matrix-client
Managing the service
Once installed, manage the service with standard systemd commands:
# Start the service
sudo systemctl start matrix-client

# Stop the service
sudo systemctl stop matrix-client

# Restart the service
sudo systemctl restart matrix-client

# View status
sudo systemctl status matrix-client

# View logs
sudo journalctl -u matrix-client -f

# View logs since last boot
sudo journalctl -u matrix-client -b

# Enable auto-start on boot
sudo systemctl enable matrix-client

# Disable auto-start
sudo systemctl disable matrix-client
Configuration reference
This section provides a complete reference for all configuration options available in the conf.yaml file.
Server configuration
# Matrix homeserver URL
homeserver: https://matrix.example.com

# Matrix homeserver domain
homeserver_domain: example.com

# API server configuration
api:
  host: 0.0.0.0
  port: 8080
Authentication
# MAS OAuth credentials
mas_client_id: your-mas-client-id
mas_client_secret: your-mas-client-secret
Database
# Database encryption key (high entropy string)
# Generate with: openssl rand -hex 32
# IMPORTANT: Never change this key after initial setup
db_key: your-64-char-hex-key
RabbitMQ
# RabbitMQ connection URL
rabbitmq_url: amqp://guest:guest@localhost:5672/
For production, use authenticated connections:
rabbitmq_url: amqp://username:password@rabbitmq-host:5672/
Bridges
Configure the bridges supported by your homeserver:
Message queues
The Client uses RabbitMQ for message routing and device management.
Adding devices queue
Incoming requests for adding devices are routed to:
exchange: "bridges.topic"
binding_key: "bridges.topic.add_new_device"
queue_name: {username}_add_new_device
Incoming messages queue
Incoming messages from bridges are routed to:
exchange: "contacts.topic"
binding_key: "contacts.topic.incoming_messages"
queue_name: {username}_incoming_messages
Message payload structure
Text and media messages follow this structure:
{
  "IsContact": true,
  "Type": "text",
  "From": "+1234567890",
  "To": "+0987654321",
  "Text": "Message content",
  "Media": {
    "Content": "base64_encoded_bytes",
    "Info": {
      "Size": 1024.5,
      "MimeType": "image/jpeg",
      "Width": 1920,
      "Height": 1080,
      "BlurHash": "LKO2?U%2Tw=w]~RBVZRi};RPxuwH"
    }
  }
}
API documentation
The Client provides interactive API documentation through Swagger UI. Access it at:
http://localhost:8080/docs/index.html
The Swagger UI allows you to:
- Browse all available endpoints
- View request and response schemas
- Test API calls directly from your browser
- See example payloads
To regenerate the Swagger documentation after code changes:
swag init
Reverse proxy configuration
For production deployments, use a reverse proxy like Nginx to handle TLS termination and route requests.
Nginx configuration with MAS
Example Nginx configuration that routes both MAS and Synapse:
server {
    listen 443 ssl http2;
    server_name matrix.example.com;

    ssl_certificate /etc/letsencrypt/live/matrix.example.com/fullchain.pem;
    ssl_certificate_key /etc/letsencrypt/live/matrix.example.com/privkey.pem;

    client_max_body_size 50M;

    # IMPORTANT: MAS SHOULD COME BEFORE SYNAPSE FOR REGEX NGINX REASONS

    # MAS-backed client auth routes
    location ~ ^/_matrix/client/(v3|v1)/(login|logout|refresh|auth_metadata|capabilities) {
        proxy_pass http://127.0.0.1:8080;
        proxy_http_version 1.1;
        proxy_set_header Host $host;
        proxy_set_header X-Forwarded-For $remote_addr;
        proxy_set_header X-Forwarded-Proto $scheme;
    }

    # Synapse endpoints
    location ~ ^(/_matrix|/_synapse/client|/_synapse/mas) {
        proxy_pass http://127.0.0.1:8008;
        proxy_http_version 1.1;
        proxy_set_header Host $host;
        proxy_set_header X-Forwarded-For $remote_addr;
        proxy_set_header X-Forwarded-Proto $scheme;
    }

    # .well-known
    location /.well-known/matrix/ {
        alias /var/www/matrix/.well-known/matrix/;
        default_type application/json;
        add_header Access-Control-Allow-Origin *;
    }
}
.well-known/matrix/client
{
  "m.homeserver": {
    "base_url": "https://matrix.example.com"
  },
  "org.matrix.msc2965.authentication": {
    "issuer": "https://auth.example.com/",
    "account": "https://auth.example.com/account/"
  }
}
Matrix Authentication Service (MAS)
MAS is required for OAuth2/OIDC authentication with Matrix.
Docker setup
Example Docker Compose configuration for MAS:
services:
  matrix-auth-service:
    image: ghcr.io/element-hq/matrix-authentication-service:latest
    container_name: matrix-auth-service
    environment:
      - MAS_CONFIG=/app/config/config.yaml
    ports:
      - "8080:8080"
      - "8081:8081" # health endpoint
    volumes:
      - ./config.yaml:/app/config/config.yaml:ro
    restart: unless-stopped
    network_mode: "host"
MAS configuration
Example config.yaml for MAS:
http:
  listeners:
  - name: web
    resources:
    - name: discovery
    - name: human
    - name: oauth
    - name: compat
    - name: graphql
    - name: assets
    binds:
      - host: 0.0.0.0
        port: 8080
    proxy_protocol: false
  - name: internal
    resources:
    - name: health
    binds:
    - host: localhost
      port: 8081
    proxy_protocol: false
  trusted_proxies:
  - 192.168.0.0/16
  - 172.16.0.0/12
  - 10.0.0.0/10
  - 127.0.0.1/8
  - fd00::/8
  - ::1/128
  public_base: https://auth.example.com/
  issuer: https://auth.example.com/

matrix:
  kind: synapse
  homeserver: matrix.example.com
  endpoint: https://matrix.example.com/
  secret: your-shared-secret-from-synapse-config

account:
  password_registration_enabled: true
  password_recovery_enabled: true
  account_deactivation_allowed: true
  login_with_email_allowed: true
For detailed MAS setup instructions, see this guide.
Security considerations
Key management
Never share or commit these sensitive values to version control:
db_keymas_client_secret
Never change the db_key after initial deployment as it will make the database unreadable.
Additional resources
Interface API
The Interface API is the primary service for user interaction in the Shortmesh ecosystem. It provides a RESTful interface for managing authentication tokens, devices, messaging, and webhooks.
Prerequisites
Before installing the Interface API, you’ll need to ensure you have the required dependencies and external services.
System requirements
The Interface API requires:
- Go 1.24.0 or higher - The Go programming language runtime and compiler
- SQLite - Lightweight database (usually pre-installed on most systems)
- RabbitMQ - Message broker for background workers
Optional but recommended:
- SQLCipher - For encrypted database support
Installing dependencies
Debian/Ubuntu
Install the required system dependencies:
sudo apt-get update
sudo apt-get install -y \
  golang-1.24 \
  libsqlite3-dev \
  libsqlcipher-dev \
  build-essential
If your distribution doesn’t have Go 1.24 in the default repositories, download it from go.dev/dl:
wget https://go.dev/dl/go1.24.0.linux-amd64.tar.gz
sudo rm -rf /usr/local/go
sudo tar -C /usr/local -xzf go1.24.0.linux-amd64.tar.gz
export PATH=$PATH:/usr/local/go/bin
Install RabbitMQ:
- For detailed RabbitMQ installation instructions, see the RabbitMQ Installation Guide.
External services
The Interface API requires two external Shortmesh services to be running:
Matrix Authentication Service (MAS)
MAS provides OAuth2/OIDC authentication for Matrix. You must configure and run MAS before starting the Interface API. See the Matrix Client MAS setup guide for detailed instructions.
Matrix Client
The Matrix Client service acts as a bridge between the Interface API and the Matrix homeserver. It handles device management, message sending, and webhook delivery. Refer to the Matrix Client documentation for setup instructions.
Quick setup
The quickest way to get started is to use the automated setup script. This method is ideal for development and testing.
Clone the repository
git clone https://github.com/shortmesh/Interface-API.git
cd Interface-API
Generate configuration
The setup script automatically creates a .env file with cryptographically secure keys:
make setup
This creates a .env file with auto-generated values for HASH_KEY, DB_ENCRYPTION_KEY, CLIENT_ID, and CLIENT_SECRET.
Alternatively, create the file manually:
cp example.env .env
Then edit .env and generate the required keys:
# Generate HASH_KEY (32 bytes base64)
openssl rand -base64 32

# Generate DB_ENCRYPTION_KEY (32 bytes hex, needed if encryption enabled)
openssl rand -hex 32

# Generate CLIENT_ID
openssl rand -hex 16

# Generate CLIENT_SECRET
openssl rand -hex 32
Configure environment variables
Edit your .env file with the required settings:
# Application mode: development or production
APP_MODE=development

# Server settings
HOST=127.0.0.1
PORT=8080

# Database configuration
SQLITE_DB_PATH=./data/shortmesh.db
DISABLE_DB_ENCRYPTION=false
DB_ENCRYPTION_KEY=<generated-key>

# Auto-run migrations (disable in production)
AUTO_MIGRATE=true

# External services (update with your values)
MAS_URL=https://mas.example.com
MAS_ADMIN_URL=https://mas.example.com/admin
ADMIN_CLIENT_ID=your-mas-admin-client-id
ADMIN_CLIENT_SECRET=your-mas-admin-client-secret
MATRIX_CLIENT_URL=http://localhost:3000

# RabbitMQ
RABBITMQ_URL=amqp://guest:guest@localhost:5672/
For a complete reference of all configuration options, see Configuration reference.
Initialize the database
Run migrations to set up the database schema:
make migrate-up
Check the migration status:
make migrate-status
Start the server
make run
The server will start and listen on http://localhost:8080. The API server includes embedded background workers for message processing.
Verify the installation
Once running, verify everything is working:
# View Swagger documentation in browser
open http://localhost:8080/docs/index.html

# Access admin dashboard
open http://localhost:8080/admin
The server provides:
- API: http://localhost:8080
- Swagger docs: http://localhost:8080/docs/index.html
- Admin dashboard: http://localhost:8080/admin
Docker
Docker provides an isolated environment and simplifies dependency management. This is suitable for both development and production deployments.
Prerequisites
Ensure you have Docker installed:
# Verify Docker installation
docker --version
Create configuration
Before building the Docker image, you need a .env file. You can create it locally:
cp example.env .env
# Edit .env with your configuration
Or use the setup script:
make setup
Build the image
Build the Docker image:
docker build -t interface-api .
For encrypted database support with SQLCipher:
docker build --build-arg ENABLE_DB_ENCRYPTION=true -t interface-api .
Then ensure your .env has:
DISABLE_DB_ENCRYPTION=false
DB_ENCRYPTION_KEY=<your-64-char-hex-key>
Run migrations
If you’ve disabled automatic migrations (AUTO_MIGRATE=false), run them manually:
docker run --rm \
  -v $(pwd)/data:/app/data \
  -v $(pwd)/.env:/app/.env \
  interface-api \
  ./migrate -action=up
Run the container
Start the API server:
docker run -d \
  --name interface-api \
  -p 8080:8080 \
  -v $(pwd)/data:/app/data \
  -v $(pwd)/.env:/app/.env \
  interface-api
View logs
docker logs -f interface-api
Stop the container
docker stop interface-api
docker rm interface-api
Docker Compose
Docker Compose orchestrates all required services including RabbitMQ, and migrations. This is the recommended approach for production deployments.
Create docker-compose.yml
Create a docker-compose.yml file in your project directory:
version: '3.8'

services:
  rabbitmq:
    image: rabbitmq:3-management-alpine
    container_name: shortmesh-rabbitmq
    ports:
      - "5672:5672"
      - "15672:15672"
    environment:
      RABBITMQ_DEFAULT_USER: guest
      RABBITMQ_DEFAULT_PASS: guest
    volumes:
      - rabbitmq_data:/var/lib/rabbitmq
    restart: unless-stopped

  migrate:
    build: .
    container_name: shortmesh-migrate
    command: ./migrate -action=up
    volumes:
      - ./data:/app/data
      - ./.env:/app/.env
    depends_on:
      - rabbitmq

  api:
    build: .
    container_name: shortmesh-api
    ports:
      - "8080:8080"
    volumes:
      - ./data:/app/data
      - ./.env:/app/.env
    environment:
      - HOST=0.0.0.0
      - PORT=8080
      - RABBITMQ_URL=amqp://guest:guest@rabbitmq:5672/
    depends_on:
      - rabbitmq
      - migrate
    restart: unless-stopped

volumes:
  rabbitmq_data:
Start all services
docker compose up -d
This will start:
- RabbitMQ message broker with management UI
- Database migrations
- API server (with embedded background workers)
View logs
# All services
docker compose logs -f

# API server logs
docker compose logs -f api
Access services
- API: http://localhost:8080
- Swagger docs: http://localhost:8080/docs/index.html
- Admin dashboard: http://localhost:8080/admin
- RabbitMQ Management: http://localhost:15672 (guest/guest)
Stop services
# Stop all services
docker compose down

# Stop and remove volumes
docker compose down -v
Rebuild after changes
docker compose up -d --build
Systemd service
For production Linux deployments, running the Interface API as a systemd service provides automatic startup, restart on failure, and integration with system logging.
Automated setup
The repository includes a setup script that handles the installation:
sudo make setup-systemd
This script will:
- Create the
/opt/interface-apidirectory - Build the binaries
- Copy files to the installation directory
- Install the systemd service unit
Manual setup
If you prefer manual setup or need more control, follow these steps:
1. Build the binaries
make build
2. Create installation directory
sudo mkdir -p /opt/interface-api
sudo cp -r bin migrations default.env .env /opt/interface-api/
sudo mkdir -p /opt/interface-api/data
3. Create dedicated user
sudo useradd --system --user-group shortmesh
sudo chown -R shortmesh:shortmesh /opt/interface-api
4. Install systemd service
sudo cp interface-api.service /etc/systemd/system/
sudo systemctl daemon-reload
5. Enable and start
sudo systemctl enable interface-api
sudo systemctl start interface-api
Managing the service
Once installed, manage the service with standard systemd commands:
# Start the service
sudo systemctl start interface-api

# Stop the service
sudo systemctl stop interface-api

# Restart the service
sudo systemctl restart interface-api

# View status
sudo systemctl status interface-api

# View logs
sudo journalctl -u interface-api -f

# View logs since last boot
sudo journalctl -u interface-api -b

# Enable auto-start on boot
sudo systemctl enable interface-api

# Disable auto-start
sudo systemctl disable interface-api
Configuration reference
This section provides a complete reference for all configuration options available in the .env file.
Server configuration
# Application mode: development or production
# Production mode enforces HTTPS and stricter security
APP_MODE=development

# Host address to bind to
# Use 127.0.0.1 for localhost only, 0.0.0.0 for all interfaces
HOST=127.0.0.1

# Port to listen on
PORT=8080

# Logging level: debug, info, warn, error
LOG_LEVEL=info
TLS/HTTPS configuration
When running in production mode (APP_MODE=production), HTTPS is enforced. Configure TLS certificates:
# Path to TLS certificate file (PEM format)
TLS_CERT_FILE=/path/to/cert.pem

# Path to TLS private key file (PEM format)
TLS_KEY_FILE=/path/to/key.pem
To generate self-signed certificates for testing:
openssl req -x509 -newkey rsa:4096 \
  -keyout key.pem -out cert.pem \
  -days 365 -nodes
Security overrides
These options allow you to relax security constraints. Use with caution in production:
# Allow HTTP in production (for use behind a reverse proxy with TLS termination)
ALLOW_INSECURE_SERVER=false

# Allow HTTP/WebSocket for external services in production
ALLOW_INSECURE_EXTERNAL=false
Database configuration
# Path to SQLite database file
SQLITE_DB_PATH=./data/shortmesh.db

# Database encryption with SQLCipher
# Set to false to enable encryption (requires SQLCipher)
DISABLE_DB_ENCRYPTION=true

# Encryption key (64-character hexadecimal string)
# Required when DISABLE_DB_ENCRYPTION=false
# Generate with: openssl rand -hex 32
DB_ENCRYPTION_KEY=

# Automatically run migrations on startup
# IMPORTANT: Set to false in production and run migrations manually
AUTO_MIGRATE=true
Cryptographic keys
Warning
Never change these keys after initial setup. Changing them will invalidate all existing tokens and encrypted data. These are automatically generated by
make setup.
# HMAC key for signing tokens (base64 encoded, 32 bytes)
# Generate with: openssl rand -base64 32
HASH_KEY=

# Database encryption key (hexadecimal, 32 bytes)
# Generate with: openssl rand -hex 32
DB_ENCRYPTION_KEY=
API authentication
Credentials for clients to authenticate with the API:
# Client ID (hexadecimal string)
# Generate with: openssl rand -hex 16
CLIENT_ID=

# Client secret (hexadecimal string)
# Generate with: openssl rand -hex 32
CLIENT_SECRET=
External services
Configuration for Matrix services:
# Matrix Authentication Service public URL
MAS_URL=https://mas.example.com

# Matrix Authentication Service admin API URL
MAS_ADMIN_URL=https://mas.example.com/admin

# Admin credentials for MAS
ADMIN_CLIENT_ID=your-mas-admin-client-id
ADMIN_CLIENT_SECRET=your-mas-admin-client-secret

# Matrix Client service URL
MATRIX_CLIENT_URL=http://localhost:3000
RabbitMQ configuration
# RabbitMQ connection URL
RABBITMQ_URL=amqp://guest:guest@localhost:5672/
For production, use authenticated connections:
RABBITMQ_URL=amqp://username:password@rabbitmq-host:5672/
Worker configuration
The default.env file contains worker and queue settings. These typically don’t need modification:
# Enable/disable message workers
WORKER_ENABLED=true
WORKER_COUNT=2

# Enable/disable webhook workers
WEBHOOK_WORKER_ENABLED=true
WEBHOOK_REFRESH_INTERVAL_SECONDS=30

# Enable/disable cleanup worker
CLEANUP_ENABLED=true
MATRIX_TOKEN_CLEANUP_INTERVAL_MINUTES=60
Database migrations
The Interface API uses migrations to manage database schema changes. Migrations ensure your database structure is up to date with the codebase.
Running migrations
For development with automatic migrations enabled (AUTO_MIGRATE=true), migrations run automatically when the server starts. For production or manual control, use these commands:
# Apply all pending migrations
make migrate-up

# Check migration status
make migrate-status

# Rollback the last migration
make migrate-down
Manual migration commands
You can also run the migration tool directly:
# Apply all pending migrations
go run cmd/migrate/main.go -action=up

# Rollback last migration
go run cmd/migrate/main.go -action=down -steps=1

# Show migration status
go run cmd/migrate/main.go -action=status
Production migration workflow
For production environments:
- Always set
AUTO_MIGRATE=falsein your.envfile - Back up your database before running migrations
- Run migrations during scheduled maintenance windows
- Test migrations on a staging environment first
- Verify migration success before restarting services
Example workflow:
# 1. Backup the database
cp data/shortmesh.db data/shortmesh.db.$(date +%Y%m%d_%H%M%S).backup

# 2. Check what migrations will be applied
make migrate-status

# 3. Run migrations
make migrate-up

# 4. Verify success
make migrate-status

# 5. If successful, restart the API server
sudo systemctl restart interface-api
For more details, see the Migration Guide.
Using the API
Once the Interface API is running, you can interact with it using HTTP requests. The API uses two authentication methods depending on the operation.
Authentication methods
Basic Authentication is used for managing credentials and tokens:
curl -u CLIENT_ID:CLIENT_SECRET http://localhost:8080/api/v1/tokens
Bearer Authentication is used for device and message operations:
curl -H "Authorization: Bearer mt_xxxxx" http://localhost:8080/api/v1/devices
Creating your first token
The first token you create is automatically marked as an admin token and creates the host Matrix identity:
# Extract credentials from .env
CLIENT_ID=$(grep '^CLIENT_ID=' .env | cut -d'=' -f2)
CLIENT_SECRET=$(grep '^CLIENT_SECRET=' .env | cut -d'=' -f2)

# Create admin token
curl -X POST http://localhost:8080/api/v1/tokens \
  -u "$CLIENT_ID:$CLIENT_SECRET" \
  -H "Content-Type: application/json" \
  -d '{"use_host": false}'
Response:
{
  "message": "Matrix token created successfully",
  "token": "mt_abc123..."
}
Save the token value for subsequent requests.
Managing devices
List available devices:
curl http://localhost:8080/api/v1/devices \
  -H "Authorization: Bearer mt_xxxxx"
API documentation
The Interface API provides interactive API documentation through Swagger UI. Access it at:
http://localhost:8080/docs/index.html
The Swagger UI allows you to:
- Browse all available endpoints
- View request and response schemas
- Test API calls directly from your browser
- See example payloads
To regenerate the Swagger documentation after code changes:
# Install swag tool (first time only)
go install github.com/swaggo/swag/cmd/swag@latest

# Generate docs
make docs
For detailed API usage examples and workflows, see the API Usage Guide.
Admin dashboard
The Interface API includes a web-based admin dashboard for managing tokens and devices through a graphical interface.
Access the dashboard at:
http://localhost:8080/admin
Features include:
- Token management (create, view, delete)
- Device monitoring and status
- Permission management
For detailed admin UI documentation, see the Admin UI Guide.
Troubleshooting
Debug logging
Enable debug logging for troubleshooting:
# Set in .env
LOG_LEVEL=debug

# Or run with debug logging
LOG_LEVEL=debug make run
Security considerations
Key management
Never share or commit these sensitive values to version control:
HASH_KEYDB_ENCRYPTION_KEYCLIENT_SECRETADMIN_CLIENT_SECRET
Never change these keys after initial deployment:
HASH_KEY- Will invalidate all existing tokensDB_ENCRYPTION_KEY- Will make the database unreadable
Reverse proxy configuration
Example Nginx configuration with TLS:
server {
    listen 443 ssl http2;
    server_name api.example.com;

    ssl_certificate /path/to/cert.pem;
    ssl_certificate_key /path/to/key.pem;

    location / {
        proxy_pass http://127.0.0.1:8080;
        proxy_set_header Host $host;
        proxy_set_header X-Real-IP $remote_addr;
        proxy_set_header X-Forwarded-For $proxy_add_x_forwarded_for;
        proxy_set_header X-Forwarded-Proto $scheme;
    }
}
For more security guidance, see the Security Documentation.
Additional resources
- API Usage Guide - Comprehensive API reference with examples
- Admin UI Management - Web dashboard documentation
- Security & Configuration - Security best practices
- Migration Guide - Database migration details
- Throttler Documentation - Rate limiting system
Authy
Authy is an open-source OTP (One-Time Password) service that generates, delivers, and verifies one-time passwords.
Prerequisites
Before installing Authy, you’ll need to ensure you have the required dependencies and external services.
System requirements
Authy requires:
- Go 1.25.0 or higher - The Go programming language runtime and compiler
- SQLite - Lightweight database (usually pre-installed on most systems)
Optional but recommended:
- SQLCipher - For encrypted database support
Installing dependencies
Debian/Ubuntu
Install the required system dependencies:
sudo apt-get update
sudo apt-get install -y \
  golang-1.25 \
  libsqlite3-dev \
  build-essential
For SQLCipher support (encrypted database):
sudo apt-get install -y libsqlcipher-dev
If your distribution doesn’t have Go 1.25 in the default repositories, download it from go.dev/dl:
wget https://go.dev/dl/go1.25.0.linux-amd64.tar.gz
sudo rm -rf /usr/local/go
sudo tar -C /usr/local -xzf go1.25.0.linux-amd64.tar.gz
export PATH=$PATH:/usr/local/go/bin
External services
Authy requires the Interface API service to be running:
Interface API
The Interface API service must be set up and running before starting Authy. The Interface API provides the core messaging infrastructure that Authy uses to deliver OTPs across different platforms.
See the Interface API setup guide for detailed installation instructions.
You will need:
- Interface API URL (e.g.,
http://localhost:8082) - Interface API authentication token
Quick setup
The quickest way to get started is to use the automated setup script. This method is ideal for development and testing.
Clone the repository
git clone https://github.com/shortmesh/Authy-API.git
cd Authy-API
Generate configuration
The setup script automatically creates a .env file with cryptographically secure keys:
make setup
This creates a .env file with auto-generated values for DB_ENCRYPTION_KEY.
Alternatively, create the file manually:
cp example.env .env
Then edit .env and generate the required keys:
# Generate DB_ENCRYPTION_KEY (32 bytes hex, needed if encryption enabled)
openssl rand -hex 32
Configure environment variables
Edit your .env file with the required settings:
# Application mode: development or production
APP_MODE=development

# Server settings
HOST=127.0.0.1
PORT=8080

# Database configuration
SQLITE_DB_PATH=./data/authy.db
DISABLE_DB_ENCRYPTION=false
DB_ENCRYPTION_KEY=<generated-key>

# Auto-run migrations (disable in production)
AUTO_MIGRATE=true

# Interface API configuration
INTERFACE_API_URL=http://localhost:8082
INTERFACE_API_TOKEN=mt_xxxxx
For a complete reference of all configuration options, see Configuration reference.
Initialize the database
Run migrations to set up the database schema:
make migrate-up
Check the migration status:
make migrate-status
Start the server
make run
The server will start and listen on http://localhost:8080.
Verify the installation
Once running, verify everything is working:
# View Swagger documentation in browser
open http://localhost:8080/docs/index.html

# Access demo UI
open http://localhost:8080/demo
The server provides:
- API: http://localhost:8080
- Swagger docs: http://localhost:8080/docs/index.html
- Demo UI: http://localhost:8080/demo
Docker
Docker provides an isolated environment and simplifies dependency management. This is suitable for both development and production deployments.
Prerequisites
Ensure you have Docker installed:
# Verify Docker installation
docker --version
Important
The Interface API service must be set up and running before starting Authy. See Interface API setup for instructions.
Create configuration
Before building the Docker image, you need a .env file. You can create it locally:
cp example.env .env
# Edit .env with your configuration
Or use the setup script:
make setup
Update the .env file with your Interface API connection details:
INTERFACE_API_URL=http://localhost:8082
INTERFACE_API_TOKEN=mt_xxxxx
Build the image
Build the Docker image:
docker build -t authy-api .
For encrypted database support with SQLCipher:
docker build --build-arg ENABLE_DB_ENCRYPTION=true -t authy-api .
Then ensure your .env has:
DISABLE_DB_ENCRYPTION=false
DB_ENCRYPTION_KEY=<your-64-char-hex-key>
Run migrations
If you’ve disabled automatic migrations (AUTO_MIGRATE=false), run them manually:
docker run --rm \
  -v $(pwd)/data:/app/data \
  -v $(pwd)/.env:/app/.env \
  authy-api \
  ./migrate -action=up
Run the container
Start the API server:
docker run -d \
  --name authy-api \
  -p 8080:8080 \
  -v $(pwd)/data:/app/data \
  -v $(pwd)/.env:/app/.env \
  authy-api
View logs
docker logs -f authy-api
Stop the container
docker stop authy-api
docker rm authy-api
Docker Compose
Docker Compose provides a simple way to run Authy alongside its dependencies.
Note
This configuration assumes Interface API is running separately. Update
INTERFACE_API_URLin your.envto point to the Interface API service.
Create docker-compose.yml
Create a docker-compose.yml file in your project directory:
version: '3.8'

services:
  migrate:
    build: .
    container_name: authy-migrate
    command: ./migrate -action=up
    volumes:
      - ./data:/app/data
      - ./.env:/app/.env

  api:
    build: .
    container_name: authy-api
    ports:
      - "8080:8080"
    volumes:
      - ./data:/app/data
      - ./.env:/app/.env
    environment:
      - HOST=0.0.0.0
      - PORT=8080
    depends_on:
      - migrate
    restart: unless-stopped
Start all services
docker compose up -d
This will start:
- Database migrations
- API server
View logs
# All services
docker compose logs -f

# API server logs
docker compose logs -f api
Access services
- API: http://localhost:8080
- Swagger docs: http://localhost:8080/docs/index.html
- Demo UI: http://localhost:8080/demo
Stop services
# Stop all services
docker compose down

# Stop and remove volumes
docker compose down -v
Rebuild after changes
docker compose up -d --build
Systemd service
For production Linux deployments, running Authy as a systemd service provides automatic startup, restart on failure, and integration with system logging.
Manual setup
1. Build the binary
make build
The make build command automatically detects the DISABLE_DB_ENCRYPTION setting in .env and uses the appropriate SQLite driver (SQLCipher or standard SQLite).
2. Create installation directory
sudo mkdir -p /opt/authy-api
sudo cp -r bin migrations default.env .env /opt/authy-api/
sudo mkdir -p /opt/authy-api/data
3. Create dedicated user
sudo useradd --system --user-group shortmesh
sudo chown -R shortmesh:shortmesh /opt/authy-api
4. Install systemd service
Create /etc/systemd/system/authy-api.service or copy from repository:
sudo cp authy-api.service /etc/systemd/system/
sudo systemctl daemon-reload
The service file should contain:
[Unit]
Description=ShortMesh Authy API
After=network.target

[Service]
Type=simple
User=shortmesh
Group=shortmesh
WorkingDirectory=/opt/authy-api
ExecStart=/opt/authy-api/bin/authy-api
Restart=on-failure
RestartSec=10

[Install]
WantedBy=multi-user.target
5. Enable and start
sudo systemctl enable authy-api
sudo systemctl start authy-api
Managing the service
Once installed, manage the service with standard systemd commands:
# Start the service
sudo systemctl start authy-api

# Stop the service
sudo systemctl stop authy-api

# Restart the service
sudo systemctl restart authy-api

# View status
sudo systemctl status authy-api

# View logs
sudo journalctl -u authy-api -f

# View logs since last boot
sudo journalctl -u authy-api -b

# Enable auto-start on boot
sudo systemctl enable authy-api

# Disable auto-start
sudo systemctl disable authy-api
Configuration reference
This section provides a complete reference for all configuration options available in the .env file.
Server configuration
# Application mode: development or production
# Production mode enforces HTTPS and stricter security
APP_MODE=development

# Host address to bind to
# Use 127.0.0.1 for localhost only, 0.0.0.0 for all interfaces
HOST=127.0.0.1

# Port to listen on
PORT=8080

# Logging level: debug, info, warn, error
LOG_LEVEL=info
TLS/HTTPS configuration
When running in production mode (APP_MODE=production), HTTPS is enforced. Configure TLS certificates:
# Path to TLS certificate file (PEM format)
TLS_CERT_FILE=/path/to/cert.pem

# Path to TLS private key file (PEM format)
TLS_KEY_FILE=/path/to/key.pem
To generate self-signed certificates for testing:
openssl req -x509 -newkey rsa:4096 \
  -keyout key.pem -out cert.pem \
  -days 365 -nodes
Security overrides
These options allow you to relax security constraints. Use with caution in production:
# Allow HTTP in production (for use behind a reverse proxy with TLS termination)
ALLOW_INSECURE_SERVER=false

# Allow HTTP for external services in production
ALLOW_INSECURE_EXTERNAL=false
Database configuration
# Path to SQLite database file
SQLITE_DB_PATH=./data/authy.db

# Database encryption with SQLCipher
# Set to false to enable encryption (requires SQLCipher)
DISABLE_DB_ENCRYPTION=true

# Encryption key (64-character hexadecimal string)
# Required when DISABLE_DB_ENCRYPTION=false
# Generate with: openssl rand -hex 32
DB_ENCRYPTION_KEY=

# Automatically run migrations on startup
# IMPORTANT: Set to false in production and run migrations manually
AUTO_MIGRATE=true
Cryptographic keys
Warning
Never change these keys after initial setup. Changing them will invalidate all existing data. These are automatically generated by
make setup.
# Database encryption key (hexadecimal, 32 bytes)
# Generate with: openssl rand -hex 32
DB_ENCRYPTION_KEY=
Interface API configuration
Configuration for connecting to the Interface API service:
# Interface API service URL
INTERFACE_API_URL=http://localhost:8082

# Token for authenticating with Interface API
# Obtain from Interface API after creating a token
INTERFACE_API_TOKEN=mt_xxxxx
To obtain an Interface API token, see the Interface API documentation.
Database migrations
Authy uses migrations to manage database schema changes. Migrations ensure your database structure is up to date with the codebase.
Running migrations
For development with automatic migrations enabled (AUTO_MIGRATE=true), migrations run automatically when the server starts. For production or manual control, use these commands:
# Apply all pending migrations
make migrate-up

# Check migration status
make migrate-status

# Rollback the last migration
make migrate-down
Manual migration commands
You can also run the migration tool directly:
# Apply all pending migrations
go run cmd/migrate/main.go -action=up

# Rollback last migration
go run cmd/migrate/main.go -action=down -steps=1

# Show migration status
go run cmd/migrate/main.go -action=status
Production migration workflow
For production environments:
- Always set
AUTO_MIGRATE=falsein your.envfile - Back up your database before running migrations
- Run migrations during scheduled maintenance windows
- Test migrations on a staging environment first
- Verify migration success before restarting services
Example workflow:
# 1. Backup the database
cp data/authy.db data/authy.db.$(date +%Y%m%d_%H%M%S).backup

# 2. Check what migrations will be applied
make migrate-status

# 3. Run migrations
make migrate-up

# 4. Verify success
make migrate-status

# 5. If successful, restart the API server
sudo systemctl restart authy-api
For more details, see the Migration Guide.
Using the API
Once Authy is running, you can interact with it using HTTP requests. See the API Usage Guide
API documentation
The Authy API provides interactive API documentation through Swagger UI. Access it at:
http://localhost:8080/docs/index.html
The Swagger UI allows you to:
- Browse all available endpoints
- View request and response schemas
- Test API calls directly from your browser
- See example payloads
To regenerate the Swagger documentation after code changes:
make docs
Demo UI
Authy includes a live demo UI that lets visitors test the complete OTP flow interactively.
Accessing the demo
The demo UI is available at:
http://localhost:8080/demo
Building the demo
The demo UI is a Vite-based React application located in pkg/web/. To build and serve it:
# Build the demo UI
cd pkg/web
make build

# Build the API server (embeds the UI)
cd ../..
make build
The demo UI is automatically embedded into the API binary and served at /demo.
Security considerations
Key management
Never share or commit these sensitive values to version control:
DB_ENCRYPTION_KEYINTERFACE_API_TOKEN
Never change the DB_ENCRYPTION_KEY after initial deployment as it will make the database unreadable.
Reverse proxy configuration
Example Nginx configuration with TLS:
server {
    listen 443 ssl http2;
    server_name authy.example.com;

    ssl_certificate /etc/letsencrypt/live/authy.example.com/fullchain.pem;
    ssl_certificate_key /etc/letsencrypt/live/authy.example.com/privkey.pem;

    location / {
        proxy_pass http://127.0.0.1:8080;
        proxy_set_header Host $host;
        proxy_set_header X-Real-IP $remote_addr;
        proxy_set_header X-Forwarded-For $proxy_add_x_forwarded_for;
        proxy_set_header X-Forwarded-Proto $scheme;
    }
}
For more security guidance, see the Security Documentation.
Additional resources
- API Usage Guide - Comprehensive API reference with examples
- Security & Configuration - Security best practices
- Migration Guide - Database migration details
Builds
The ShortMesh Builds repository provides Docker Compose orchestration for all ShortMesh services. It simplifies deployment by managing the entire stack with a single command, including RabbitMQ, Matrix Client, Interface API, and Authy API.
Prerequisites
Before setting up the Builds stack, ensure you have the required tools installed.
System requirements
The Builds stack requires:
- Docker (v20.10+) - Container runtime
- Docker Compose (v2.0+) - Multi-container orchestration (included with Docker Desktop)
Installing Docker
Debian/Ubuntu
# Update package index
sudo apt-get update

# Install Docker
curl -fsSL https://get.docker.com -o get-docker.sh
sudo sh get-docker.sh

# Add your user to docker group
sudo usermod -aG docker $USER
newgrp docker

# Verify installation
docker --version
docker compose version
macOS
Install Docker Desktop:
brew install --cask docker
Or download from Docker Desktop for Mac.
For detailed installation guides, see the Docker Installation Documentation.
External services
The Builds stack orchestrates all required ShortMesh services. However, you still need:
Matrix Homeserver
A running Matrix homeserver (e.g., Synapse) is required. See the Synapse setup guide for instructions on setting up a Matrix homeserver.
Matrix Authentication Service (MAS)
MAS provides OAuth2/OIDC authentication for Matrix. Configure and run MAS before starting the stack.
Matrix Bridges
Configure the bridges you want to support on your homeserver (WhatsApp, Telegram, Signal, etc.). See the Client setup guide for bridge configuration details.
Quick setup
The quickest way to get started is to use the automated setup script that configures all services at once.
Clone the repository
git clone https://github.com/shortmesh/Builds.git
cd Builds
Run complete setup
The setup script will interactively guide you through configuring all services:
make setup
This will:
- Create root
.envfile with Docker Compose settings - Generate
config/client/conf.yamlfor Matrix Client - Generate
config/interface-api/.envwith secure keys - Generate
config/authy-api/.envwith secure keys - Automatically fetch an Interface API token for Authy
Start all services
make up
This command starts:
- RabbitMQ - Message broker (internal)
- Matrix Client - Bridge service with Matrix homeserver (internal)
- Interface API - Core messaging API (localhost:8082)
- Authy API - OTP authentication service (localhost:8083)
View logs
# All services
make logs

# ShortMesh services only
make logs-shortmesh

# Specific service
make logs-interface
make logs-authy
make logs-client
make logs-rabbitmq
Verify installation
Once running, verify everything is working:
# Check service health
make health

# View resource usage
make stats
Access the services:
- Interface API: http://localhost:8082
- Interface API Admin: http://localhost:8082/admin
- Interface API Docs: http://localhost:8082/docs/index.html
- Authy API: http://localhost:8083
- Authy API Docs: http://localhost:8083/docs/index.html
- Authy Demo: http://localhost:8083/demo
Manual setup
If you prefer manual configuration or need more control over the setup process, follow these steps.
Setup individual services
Configure each service separately:
# Setup environment variables
make setup-env

# Setup Matrix Client
make setup-client

# Setup Interface API
make setup-interface

# Setup Authy API
make setup-authy
Environment variables
The root .env file controls Docker Compose settings:
# RabbitMQ credentials
RABBITMQ_USER=guest
RABBITMQ_PASS=guest

# Database encryption (requires rebuild)
ENABLE_DB_ENCRYPTION=false
Service configurations
Matrix Client
Configuration location: config/client/conf.yaml
Key settings:
- Matrix homeserver URL and domain
- MAS client credentials
- Database encryption key
- RabbitMQ connection
- Bridge configurations
See the Client setup guide for detailed configuration options.
Interface API
Configuration location: config/interface-api/.env
Key settings:
- Server host and port
- Database path and encryption
- MAS and Matrix Client URLs
- Client credentials
- RabbitMQ connection
See the Interface API setup guide for detailed configuration options.
Authy API
Configuration location: config/authy-api/.env
Key settings:
- Server host and port
- Database path and encryption
- Interface API URL and token
See the Authy setup guide for detailed configuration options.
Managing services
Use the Makefile commands to manage the stack lifecycle.
Starting and stopping
# Start all services
make up

# Stop all services
make down

# Restart all services
make restart

# Restart ShortMesh services only
make restart-shortmesh
Individual service control
# Restart specific service
docker compose restart matrix-client
docker compose restart interface-api
docker compose restart authy-api

# Stop specific service
docker compose stop interface-api

# Start specific service
docker compose start interface-api
Building and rebuilding
# Build all images
make build

# Rebuild and restart all services
make rebuild

# Rebuild ShortMesh services only
make rebuild-shortmesh

# Pull latest images from registry
make pull
Database migrations
Run migrations when updating services:
# Interface API migrations
make migrate-interface

# Authy API migrations
make migrate-authy
Debugging
Access shell in running containers:
# Shell access
make shell-client
make shell-interface
make shell-authy

# Or use docker compose directly
docker compose exec matrix-client sh
docker compose exec interface-api sh
docker compose exec authy-api sh
Configuration management
Fetching default configurations
Pull the latest default configurations from upstream repositories:
make fetch-defaults
Resetting configurations
Remove all generated configuration files:
# Remove all configs
make clean-config

# Remove specific service config
make clean-config-client
make clean-config-interface
make clean-config-authy
make clean-config-env
After cleaning, re-run setup:
make setup
Updating configurations
After modifying service configurations, restart the affected services:
# Matrix Client
make restart-client

# Interface API
make restart-interface

# Authy API
make restart-authy

# All services
make restart
Network architecture
Services communicate via an internal Docker bridge network named shortmesh-network.
Internal services
These services are only accessible within the Docker network:
- RabbitMQ:
rabbitmq:5672(AMQP),rabbitmq:15672(Management) - Matrix Client:
matrix-client:8080
External services
These services are exposed to localhost only:
- Interface API:
127.0.0.1:8082 - Authy API:
127.0.0.1:8083
Service URLs
When services communicate internally, they use internal hostnames:
# Interface API connects to Matrix Client
MATRIX_CLIENT_URL=http://matrix-client:8080

# Interface API connects to RabbitMQ
RABBITMQ_URL=amqp://guest:guest@rabbitmq:5672/

# Authy API connects to Interface API
INTERFACE_API_URL=http://interface-api:8080
Database encryption
Enable SQLCipher encryption for all services at build time.
Enabling encryption
Set in root .env file:
ENABLE_DB_ENCRYPTION=true
This build argument is passed to all services during the build process.
Rebuild after enabling
Encryption requires rebuilding all images:
make rebuild
Service configuration
After enabling encryption and rebuilding, ensure each service’s .env has:
DISABLE_DB_ENCRYPTION=false
DB_ENCRYPTION_KEY=<64-char-hex-key>
Keys are automatically generated by make setup.
Maintenance
Health checks
Check service status:
# Quick health check
make health

# Docker Compose status
docker compose ps

# Detailed service info
docker compose ps --format json
Resource monitoring
View resource usage:
# Resource stats
make stats

# Docker stats
docker stats
Backup
Backup service configurations:
make backup
This creates a timestamped backup of all configuration files.
Cleanup
Remove stopped containers and unused resources:
# Remove stopped containers
make clean

# Remove all containers and volumes (DESTRUCTIVE)
docker compose down -v
Validation
Validate the Docker Compose configuration:
make validate
Troubleshooting
Common issues
Service fails to start: Check logs for the specific service:
make logs-interface
docker compose logs interface-api
Database locked: Ensure only one instance of the service is running:
docker compose ps
docker compose down
make up
Port already in use: Check if another service is using the same port:
sudo lsof -i :8082
sudo lsof -i :8083
Migration failed: Run migrations manually:
make migrate-interface
make migrate-authy
Resetting everything
If you encounter persistent issues, reset the entire stack:
# Stop all services
make down

# Remove all configs
make clean-config

# Remove all volumes (DESTRUCTIVE - deletes all data)
docker compose down -v

# Re-setup
make setup
make up
Debug logging
Enable debug logging in service configurations:
Interface API (config/interface-api/.env):
LOG_LEVEL=debug
Authy API (config/authy-api/.env):
LOG_LEVEL=debug
Then restart the service:
make restart-interface
make restart-authy
Makefile reference
Complete list of available commands:
Setup commands
make setup               # Complete setup (all services)
make setup-env           # Setup environment variables
make setup-client        # Setup Matrix Client
make setup-interface     # Setup Interface API
make setup-authy         # Setup Authy API
make fetch-defaults      # Fetch fresh defaults from upstream
Control commands
make up                  # Start all services
make down                # Stop all services
make restart             # Restart all services
make restart-shortmesh   # Restart ShortMesh services only
Logging commands
make logs                # All services
make logs-shortmesh      # ShortMesh services
make logs-client         # Matrix Client
make logs-interface      # Interface API
make logs-authy          # Authy API
make logs-rabbitmq       # RabbitMQ
Database commands
make migrate-interface   # Run Interface migrations
make migrate-authy       # Run Authy migrations
Build commands
make build               # Build all images
make rebuild             # Rebuild and restart
make rebuild-shortmesh   # Rebuild ShortMesh only
make pull                # Pull latest images
Debug commands
make shell-client        # Shell access to client
make shell-interface     # Shell access to Interface API
make shell-authy         # Shell access to Authy API
Maintenance commands
make health              # Check service health
make stats               # View resource usage
make backup              # Backup configurations
make clean               # Remove stopped containers
make clean-config        # Remove all generated configs
make validate            # Validate docker-compose.yml
Help
make help # Show all available commands
Additional resources
- Configuration Guide - Detailed configuration reference
- Client Setup - Matrix Client setup guide
- Interface API Setup - Interface API setup guide
- Authy Setup - Authy API setup guide
- Docker Documentation - Official Docker documentation
- Docker Compose Documentation - Docker Compose reference